Isn’t it just amazing how the 21st century has revolutionized the way we do our business these days? Of course, I can blabber a lot about various marvels of this generation, but for now, let us focus on the topic for which you have decided to visit this page. We focus on the Interac + Moneris Online Payments (Hosted) – Odoo Connector in this write-up.
For those of you who are still new to this world of Odoo connector, let me brief you a bit about the basics. Odoo is a source of various open-source apps that you can combine and use as a comprehensive ERP solution. You can choose from free or paid versions from Odoo. However, our prime focus is on the Odoo connector for Interac and Moneris online payment in this article.
A Comprehensive Info on Interac + Moneris Online Payments
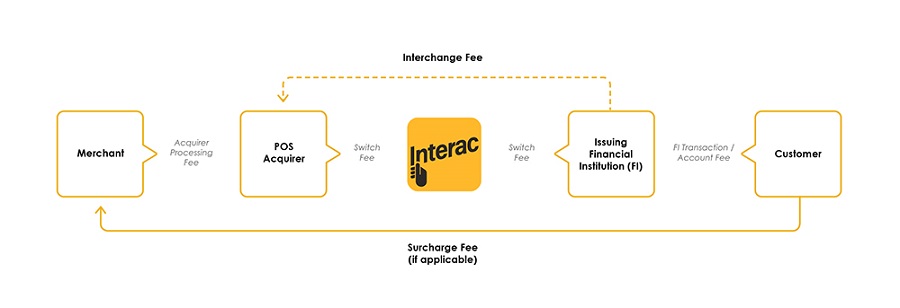
Moneris is an organization from Canada that specializes in financial technology with a prime focus on payment processing. When you use this third-party app of Interac + Moneris Online Payments, you can add Moneris as the payment receiver for Odoo.
What’s more is that if you are a merchant, you can accept payment through Moneris’s online hosted payment processing solution on Odoo. Another exciting feature of this flawless app is that you can easily integrate the Credit card payment into the B2B sales app.
In brief, Interac + Moneris Online Payments can be used to integrate payments with:
- Sales order payment, and
- eCommerce checkout page
A few more details about Interac Online Payment:
- Interac online payment allows online banking and transactions to Canadian cardholders
- When using this payment, system users are shown a screen before the final payment acceptance. This screen allows the cardholder to select how they prefer to pay
- A Certification is mandatory to use Interac online payment
How Does The App Work?
The workflow of Interac + Moneris Online Payments app is pretty flawless. When the customer uses your online platform to reach the checkout page, the user is redirected to the Moniers hosted payment page with the click of payment option selection.
After the payment details are entered from the user end, the merchant transaction verification response process takes place. Once the payment is made, the user gets the relevant message – a receipt in case of payment acceptance or a failure-response if the payment fails.
What Is the Process to Install Interac + Moneris Online Payments (Hosted) – Odoo Connector?
The process to install this app is pretty straightforward. However, if you are new to this type of installation, you may use the following step-by-step guide to help you with the installation:
- Post your purchase of this module from the Odoo store, and you shall receive a link that allows you to download a zip file
- Once your download is complete, extract the file on your system in a specific folder
- Now, you need to copy this folder and paste it into your Odoo add-ons path
- Go to the Odoo conf file and add the folder path of the extracted zip file
- Now, restart the server
- You must now login to Odoo and then click the Settings menu
- Now you need to activate the developer mode by either clicking on the “Activate the Developer Mode” button or by typing “?debug=1” after “/web” in the URL
- Once you have done the above step, go to the Apps menu and click “Update Modules List.”
- Search for “payment_moneris_hosted” in the search bar, and you can see the Moneris Payment Acquirer (Hosted) in the result
- Click install
- Start by installing the “Moneris Payment Acquirer (Hosted)” app
- Now install “payment_moneris_hosted_interac” using the same steps above for searching and installing
How to Configure Moneris in the Admin Panel?
By now, you must have gotten a pretty clear idea about the benefits and features of the Interac + Moneris Online Payments (Hosted) – Odoo Connector. This section looks at the straightforward steps to help you configure Moneris in your admin panel. Here are the steps:
- Go to the admin panel and get into Hosted Paypage Config
- You can see the transaction type with two options. Select “Purchase”
- Now you need to specify the payment method in the section with the same name. Tick the checkboxes “Credit Cards” and “INTERAC Online.”
- Go to the Paypage Appearance section and click “Configure Appearance.”
- Tick the following boxes:
· Display item details
· Display customer details (cust_id,..)
· Display shipping address details
· Display billing address details
· Display merchant name
· Display CVD input. (Credit Card only)
- In the same section, “Cancel Button Text” must be set at “Cancel Transaction”, and “Cancel Button URL” must mention “https://YOUR_DOMAIN/payment/moneris/cancel/
- Now you need to return to the main configuration. You can do this from the top of your current page
- Click on the “Configure Response Fields” in the Response/Receipt Data Section
- Tick the checkbox with the text “Return the txn_number. This field is used to perform follow-ons.”
- Press save and return to the main configuration from the top of the page again
- Configure Security in the Security Features section
- Tick the checkbox with the text “Enable Transaction Verification”, and the response method must be set to “Sent to your server as a POST”. The response URL must be set to “https://YOUR_DOMAIN.COM/payment/moneris/dpn/
The Process to Activate Your Store
Visit https://www3.moneris.com/connect/en/activate/index.php after you receive your activation letter. Once you are on the URL, you will be required to insert your store ID and merchant ID in the respective sections and click on “Activate”.
Now you will have to make an administrator account to log into the Merchant Resource Center. It will allow you to administer and access your Moneris Gateway store.
Configuring Your Store for Production
Post the activation of your store, you will have to point your store to the production host, and hence you need to do the following configuration:
You need to change the ps_store_id and hpp_key to display your production store configuration In Odoo.
Once you get into production, you can visit www3.moneris.com/mpg to access the Merchant Resource Center. Here, you will have to use your store administrator ID and then proceed to create new users as per your requirement.
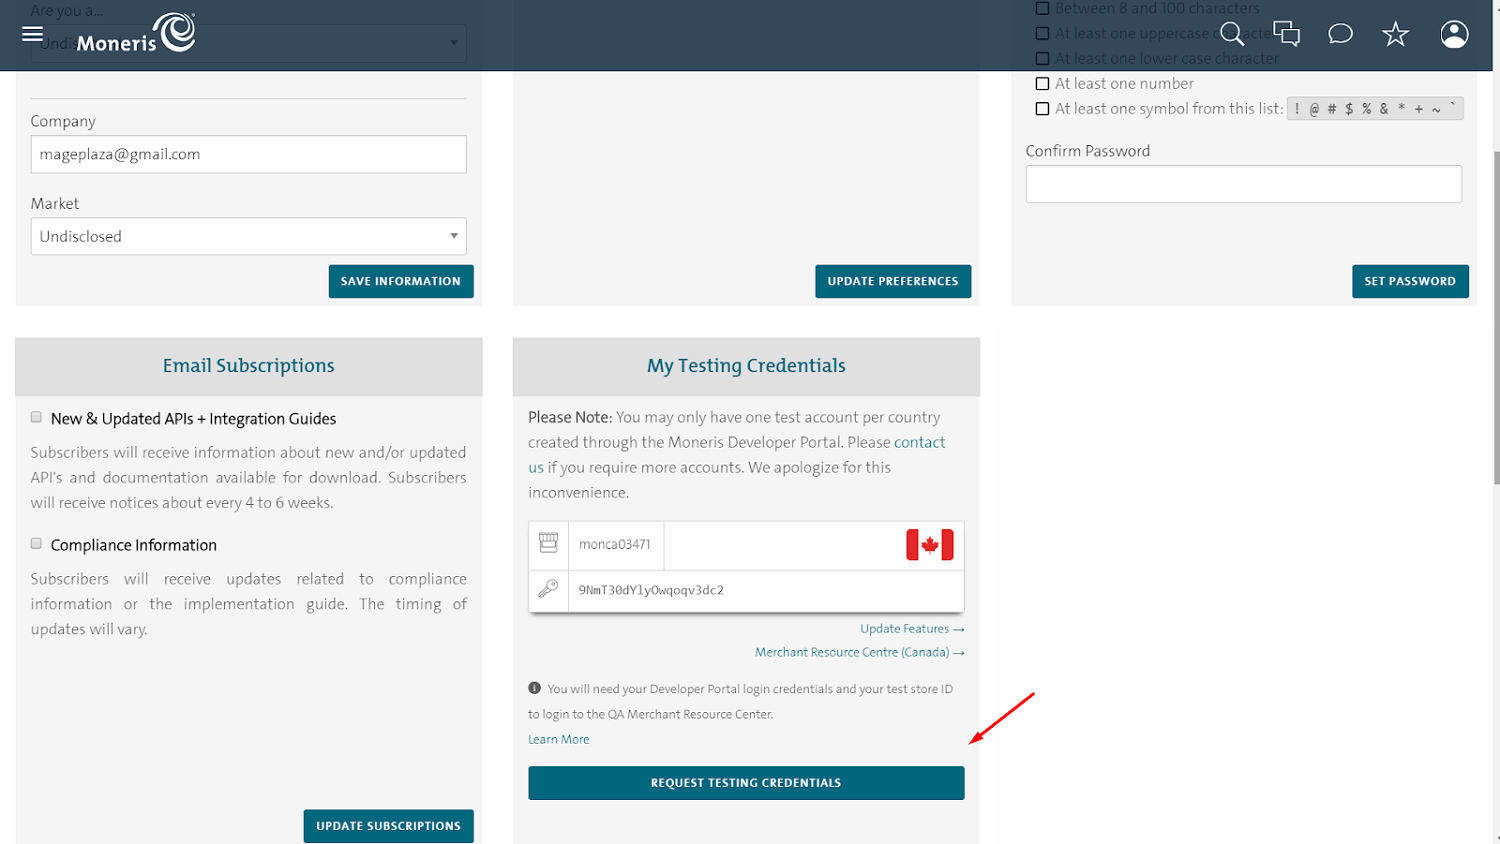
Is There a Way to Do Testing?
Yes. In order to do Moneris Testing, you need to use the following testing URL:
You can use the following username and password credentials:
username-demouser,
store-store3
Password-password
Now go to the Admin section and check Hosted Paypage Config. Find “Generate a new Configuration” and click on it.
If you want to perform a test using cards, you will have to use the following URL:
https://developer.moneris.com/en/More/Testing/Testing a Solution
If you need to perform a test, you can use the following information and enter it in the respective fields. Make sure that you do not make any changes in it and put them as it is:
| IDEBIT_TRACK2 | IDEBIT_ISSNAME | IDEBIT_ISSCONF |
| 3728024906540591206=01121122334455000 | RBC | 123456 |
| 5268051119993326=01121122334455000000 | ||
| 453781122255=011211223344550000000000 |
If you need a declined response, you can provide any value as the IDEBIT_TRACK2. Now click “Post to Merchant” but do not click “Validate Data”. It should return the validation errors now.
Final Thoughts
There are numerous options for Odoo connectors available in the marketplace. However, this write-up focused specifically on Interac + Moneris Online Payments(Hosted) – Odoo Connector that caters to Canadian Users and Merchants.
The article’s purpose was to give you comprehensive guidance on how you could use this app to the best of its purpose. We understand that there is not enough information available as of now on the features, installation and usage guide of this app. Hopefully, you find this write-up helpful and are able to integrate this app effortlessly and quickly.